What you'll need
A Wi-Fi access point
A Google account and password
Difficulty
How to set up a new Android device
In this lesson we look at how to setup a brand new Android device, if your device is already setup then you can skip to the next lesson where we start to look at how to navigate the Android user interface.
Don’t own an Android device? Check out our Smartphone buyers guide to find out what to look for in a new Android device. The Smartphone Buyers Guide
Before starting the setup process ensure you have access to a Wi-Fi connection so your new Android device can access the internet, this is a requirement of the setup process. You also require a Google account, if you don’t have one however, you can create one as part of the setup process.
Note that these steps may vary depending which device you have. If there are any extra steps that aren’t documented here just answer as best you can.
Setting up your Android device
- Start off by turning on your device, to do this hold down the power button until the Google logo appears onscreen, the power button should be a short button on the side of your device as displayed below. If your device doesn’t start up it may need to be charged up first. Refer to your phone’s quick start guide if you’re still stuck.

- Once your device starts up you should get a screen similar to this one. If you need to change your language tap on the current language and a box will come up to change languages. Once you’re ready, tap the arrow to continue.

- The next step is to connect to a Wi-Fi network to gain access to the internet, select a nearby network, enter the password in the dialog that pops up, and then tap “Connect” The screen will then say “Checking connection” once your device verifies there is internet access the next step be shown.

- You may be asked if you have another device during the setup process, if you do you can optionally copy all of the settings and apps over to your new device, if you just want to set up your devices as a new one then tap “No, thanks” and then “Next” in the bottom right corner of the screen.

- Next you will need to login to the device using your Google account, this will tie the device to your account and allow you to access services like the Google Play Store, which allows you to install apps and games to your device. We’ll go over that more in later lessons.Tap into the Email text box and type in your email address that’s tied to your google account, this will most likely be a Gmail address like (example@gmail.com) Once you’ve entered your email address tap “next”

- Now you will be asked to enter your password, tap into the password text box and type in your Google account password. Once that’s done tap “next”

- You will then be asked to accept Googles Terms and Conditions and Privacy Policy. Feel free to have a browse through the policies by tapping on the respective links, once you’re ready to continue, tap the “Accept” button in the bottom right corner of the screen.

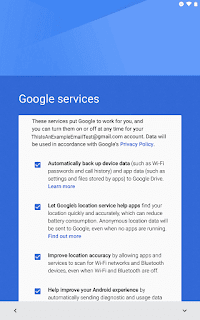
- Once Google has verified your email and password you’ll then see a screen with a couple of checkboxes. These are a list of services that are offered that can improve your overall experience using the device, however, if you want to disable them for privacy reasons you may do so. Have a look through which options you’d like and then tap next when you’re finished.
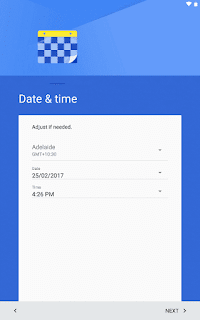
- You may be asked to check that the date and time is correct, if you see this screen just double check that it’s correct and tap “next”
- The last step asks you whether you would like to setup an additional email address, this is so you can receive your emails on your device and is only relevant if you have a separate home or work email address that you need to access. If this step doesn’t apply to you then tap “Not now” and then tap “next” from the bottom right corner of the screen.

- If your device is brand new then that should be the last step required, although if you have had the device before and are resetting it then there may be an extra step required.
- With the setup complete you should reach a screen that looks like this. To learn more about your device continue to the next lesson by clicking the “Next lesson” button below.

You should now have a fully setup and fully working new Android device, congratulations.
Attributions
Was this helpful?
Comments
Post a Comment